If you've been involved in the hobby for any length of time, you've either heard modelers talk about or read about a modeler using an airbrush. In fact, it's not just a "model railroader's" tool, almost every model builder owns at least one. Not just model builders, either. Grahpic artists, custom painters (have you ever witnessed the custom paint work on an auto or a motorcycle fuel tank?), luthiers, furniture restoration personnel, etc. all use airbrushes to some extent. Whenever one needs to apply very small amounts of finish with great control, the airbrush is the tool to use.
In my shop, besides razor blades, airbrushes are the most versatile tools that I own. 99% of all the finish that I apply goes on with an airbrush - priming, painting, weathering, clear coats, even blowing dust from a model - all with an airbrush.
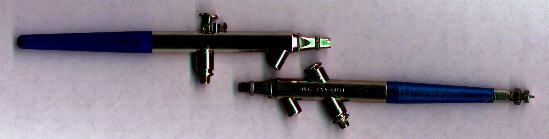
An airbrush is basically a small spray gun, delivering a measured ammount (in PSI) of air and a given quantity of medium (paint, etc), mixing the two and delivering it to the surface of your work. Pictured above are the two types that I use regularly. More on them in a bit.
The Basics.
There are several different types. As follows:
* Single action - external mix,
* Single action - internal mix, and
* Double action - internal mix.
Single Action vs. Double Action.
In airbrush - speak, the term "action" is used to describe what the trigger does. The gun in the lower right part of the photo is a single - action type. The trigger controls one thing - the air flow. Push the trigger down, air flows - release the trigger, air ceases to flow. At the back end of the gun you'll notice a knurled wheel. That's the needle adjust, used to control the flow of paint. Turn the wheel counter-clockwise, more paint will feed into the gun - clockwise, less paint.
Double action airbrushes (the upper left gun in the photo) have a trigger that controls both the air flow and the needle. Trigger down, air on - trigger up, air off - trigger forward, less paint - trigger back, more paint.
External Mix vs. Internal Mix.
This deals with where in the gun that the air and paint are mixed before they head toward your work. External mix airbrushes mix their paint outside of the body of the gun, usually right at the air tip. Also, external mix guns don't have needles, either. When you depress the trigger of an external mix gun, air flows from the air tip over the paint tip, creating a vacuum that pulls medium up thru the paint tip, with the air flow then carrying paint to the work. All in all, it's a fairly straightforward process that works OK for beginners.
Internal mix guns mix their paint inside the tool, behind the opening in the air tip. Depress the trigger, air flow creates vacuum, pulling paint into the gun, paint and air mix, travel across the needle through the opening in the air tip and out to your work.
Pros and Cons.
I started shooting with the good ol' single-action external mix gun. Badger makes one that can be purchased for around $25 - $30. It comes with the gun, a couple of jars, air hose and Propel (a can of air) and will yield good results for a beginner. There are some disadvantages, however. The biggest problem with external mix guns is that, with the paint mixing outside of the gun, the paint has a tendency do dry real fast, sometimes before it hits your work, leaving a rough, "grainy" finish. Also, depending upon your climate (Montana gets bone-dry sometimes), paint will actually set inside the paint tip, causing you to stop, clean the paint tip, etc. If you go this route, I recommend using an additional 10 to 20% thinner in your paint mix.
Now. What I would honestly recommend to a beginner is Badger's Model 200 single-action internal mix airbrush. I believe that the current price for the beginner's set in the Walther's catalog is around $70. This gives you the gun, jars, braided hose, color cup, Propel - everything to get rolling. With a little practice, you can produce some real quality work with this gun. In fact, after 12 years of custom painting (and a ton of my own projects as well), it still works great. Because it's a single action gun, I use it on all my paint jobs where I need a good, even coat of finish. This is also a good gun for weathering, although you might find that twisting the needle wheel constantly for different paint flow rates will get a little bothersome.
The double-action internal mix gun is obviously the most versatile airbrush that there is. While it's a little tricky to master at first, what with the trigger going four different ways, you'll find that you can pull off all kinds of different effects with it.
The Airbrush(es) and the Hackitup Shop.
My gun of choice is Badger for several reasons. First off, they are affordable and they were readily available in Bozeman, Montana. Second, parts are readily available at most shops in the state. Having said that, with the exception of the teflon O-ring seal for the air tip and jar gaskets, I've never had any problems with Badger products. As stated before, I've shot with them for over 12 years with terrific results.
Right now, I have two guns - the Badger Model 200 and the Model 150. I have full tip/needle sets for both (fine, medium and large pattern). As I spray primarily with the medium tip/needle set, I keep and additional medium tip/needle set on hand for each gun, just in case I do something silly like crush a tip (happened once) or bend a needle (happened twice - I was able to bend it back and hone out the kink -I attribute it to shear luck).
I use the 200 gun for the bulk of my paint work. I'll set the paint flow and the air pressure and commence to spraying. While some modelers prefer a double-action gun for this, I like having a constant flow of paint when shooting a shell. Inevitably, I'll pull the trigger on a double-action brush too far back and end up with a mess.
The 150 gun is a blast when it comes to effects, weathering, etc. I've only been using this gun for about 6 years and I still have a ton to learn.
Maintenance on the guns goes as follows: After a spray session I'll blow thinner thru each gun, remove the air and paint tips, pull the needles and soak them in laquer thinner, wipe everything down, reassemble and they're good to go for the next time. Every month or two, I'll tear both guns down and soak the parts (but not the bodies!!) in Ko-i-noor techical pen cleaner for a day or two. This stuff removes any and all paint deposits accumulated over time. I rinse everything in water and reassemble. The reason you don't want to soak the airbrush bodies is to keep fluids from getting into the valve assemblies, which is a bad thing, unless you want to tear down the entire valve assembly to clean it, which you should never have to do. Periodically, I'll apply some beeswax to the needles, heat them briefly in a candle flame and wipe them clean. The beeswax will fill any microscopic pits that are present, helping paint flow across the needle, eliminating some of the paint buildup.
The Settup.
I have two compressors, the permanent one at the shop and a little W.R. Brown compressor that I can take to the club or to a clinic. The one here at the shop is a unique one. In its last life, I believe that it was used to cool circuitry on a microwave tower for the phone company. It is powered by a 1/2 hp motor and has a 1 gallon tank, producing a constant 40 psi. From there, the air goes through an oil trap, then a moisture trap/filter, then to a header with 4 spigots for Badger air hose fittings. From there, I run Badger braided hose to the separate guns. I clean the traps every 6 months and I've torn down and cleaned the compressor head only once. That's it for maintenance.
Depending on what I'm painting, It's not uncommon for me to use both guns (and wish that I had a third). When shooting the Oakway unit, for example, I had the 200 gun set up with straight color (EMD Blue) and the 150 gun ready to shoot three diferent shades of "Off EMD Blue" for faded paint effects. When weathering, the 200 gun is used with 3-4 bottles of "clear" solutions (different intensities of flat with grays/grimes mixed in) and the 150 gun used to apply actual weathering shades. Having more than one gun helps to make the projects flow, cutting down on the ammount of time spent cleaning jars, guns, etc. I just blow thinner thru the gun before changing colors and I'm off to the races again. Sometimes I'll find myself spraying two entirely different mediums when weathering. For example, I'll be using Testor's Model Master in one gun and Polly Scale in the other. No need to wait for thinner or water to evaporate from either gun.
So, pick up an airbrush when you can. After using one for a while, you'll find yourself wondering why you went without one for so long.
Back to the Tools page.....